
GoogleAppsScriptによるWebアプリ構築ボイラープレートを作成しました
概要
GoogleAppsScriptでWebアプリを作成するための環境を構築しました。
もう一度同じものを作るためには手順が多かったため、ボイラープレートとして再利用できるようにしました。
DevContainer、React、TypeScriptあたりを使用し、VSCodeでの開発を想定しています。
構築手順
構築手順は以下の通りなので、好みに応じてアレンジしてみるのも良いかと思います。
1. DevContainer の定義
プロジェクトのフォルダを作成し、直下に .devcontainer フォルダを作成。
その中に devcontainer.json を作成して内容を以下のようにします。
{
  "name": "container name",
  "image": "mcr.microsoft.com/devcontainers/typescript-node:1-22-bookworm",
  "customizations": {
    "vscode": {
      "extensions": ["esbenp.prettier-vscode"]
    }
  },
  "postCreateCommand": "yarn && yarn global add @google/clasp"
}
VSCodeの場合の拡張機能はとりあえず Prettier だけ入れました。
postCreateCommand ではパッケージのインストールを行いますが、yarn global add @google/clasp で clasp のインストールも定義しています。
以降の作業は DevContainer を起動して行っていきます。
この辺で git init もしておきます。
clasp を global で入れるか否かについては色々あるようですが、今回は何も考えずに global インストールしています。コンテナ内なので global で問題ないと思っています。
全体を通して yarn を使用していますが特に理由はないので npm でも問題ありません。
2. Vite による React の導入
yarn create vite で React + TypeScript の導入を行います。
$ yarn create vite

? Project name: your project name # プロジェクトのフォルダ名と合わせておくと良いです
? Select a framework: React
? Select a variant: TypeScript + SWC

$ cd your project name
$ yarn
$ yarn dev
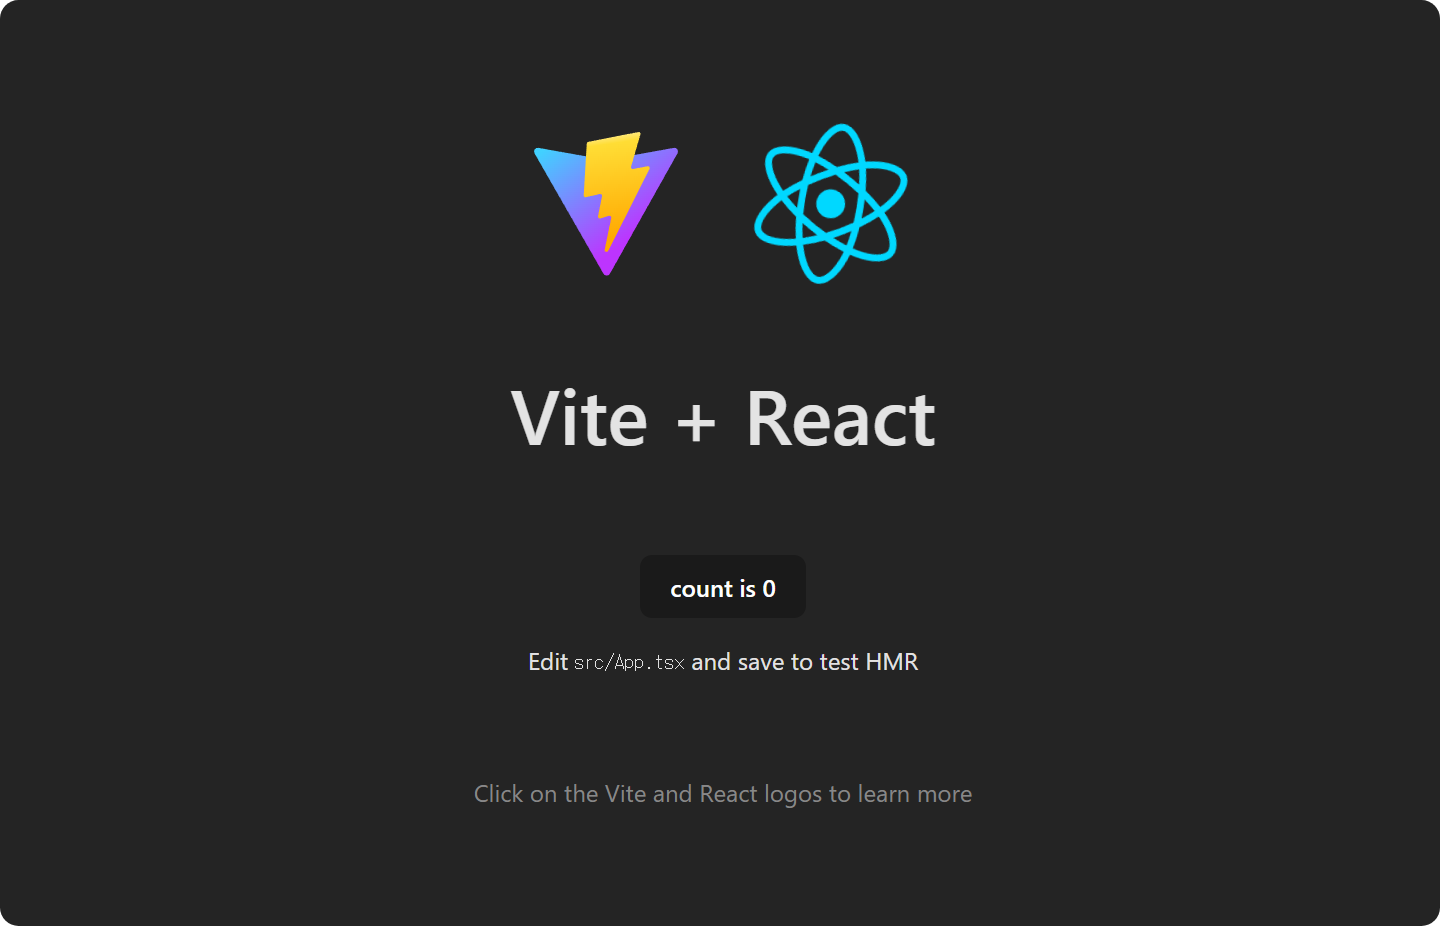
とりあえずの起動確認ができました。
フォルダ構成の変更
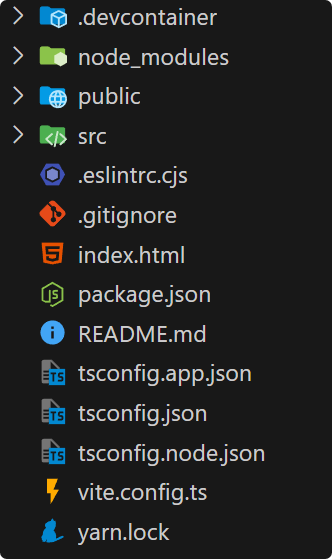
今作成したプロジェクトフォルダの中身をすべてプロジェクトのルートに移動し、空になったフォルダは削除します。
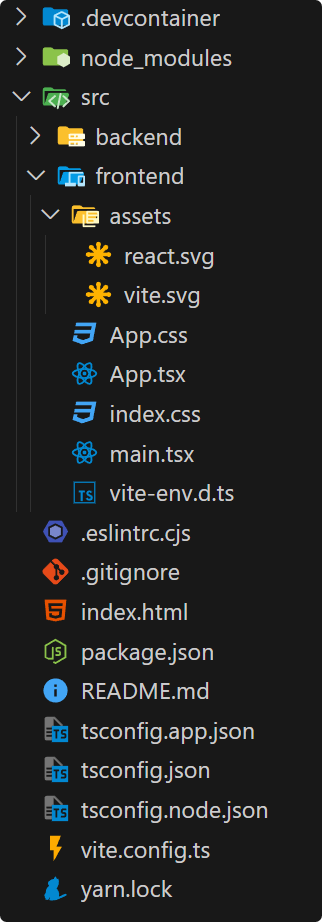
次に現在の src フォルダの中身を frontend フォルダにまとめておきます。
ついでに backend フォルダも作成しておきます。
root/public 内の vite.svg は src/frontend/assets に移動し、フォルダは削除してしまいます。
構成を変更したので一部のファイルを修正します。
<!doctype html>
<html lang="en">
  <head>
    <meta charset="UTF-8" />
-    <link rel="icon" type="image/svg+xml" href="/vite.svg" />
    <meta name="viewport" content="width=device-width, initial-scale=1.0" />
    <title>Vite + React + TS</title>
  </head>
  <body>
    <div id="root"></div>
-    <script type="module" src="/src/main.tsx"></script>
+    <script type="module" src="/src/frontend/main.tsx"></script>
  </body>
</html>import { useState } from 'react'
import reactLogo from './assets/react.svg'
- import viteLogo from '/vite.svg'
+ import viteLogo from './assets/vite.svg'
import './App.css'ここまでで yarn dev を実行すると先ほどと同じ画面が表示されます。
3. 各種パッケージのインストール
GoogleAppsScriptの開発に関係する以下のパッケージをインストールします。
$ yarn global add @google/clasp
$ yarn add --dev @types/google-apps-script
$ yarn add --dev vite-plugin-singlefile
$ yarn add --dev rollup-plugin-google-apps-script
$ yarn add gas-client
4. デプロイするファイルの出力ディレクトリを作成
yarn build で最終的なファイルを出力するディレクトリを作成します。
プロジェクトルートに gas フォルダを作成します。
最終的には gas/dist にファイルが出力されます。
デプロイ時に必要となる appsscript.json も gas の直下に作成しておきます。
{
  "timeZone": "Asia/Tokyo",
  "dependencies": {},
  "webapp": {
    "executeAs": "USER_DEPLOYING",
    "access": "MYSELF"
  },
  "exceptionLogging": "STACKDRIVER",
  "runtimeVersion": "V8"
}
5. バックエンドのサンプル関数を作成
src/backend に serverFunctions フォルダを作成します。
中に index.ts を作成し、内容を以下のようにします。
受け取った数値をプラス1して返すだけのサンプル関数です。
export const sampleFunction = (num: number): number => num + 1;src/backend 直下に main.ts を作成し、内容を以下のようにします。
import { sampleFunction } from "./serverFunctions";

declare const global: {
  [x: string]: unknown;
};

// This function is required to run as a webApp
global.doGet = (): GoogleAppsScript.HTML.HtmlOutput => {
  return HtmlService.createHtmlOutputFromFile("dist/index.html");
};

// Create the necessary functions below.
global.sampleFunction = sampleFunction;
global.doGet は GoogleAppsScript でWebアプリを立ち上げるために必要な関数です。
global.sampleFunction のように関数をグローバルに定義し、フロントエンド側から呼び出すことができるようになりました。
Vite+Reactのスタートページではサンプルとしてクリックするとカウントアップするボタンが設置されています。
Webアプリを立ち上げた際には、先程作成した sampleFunction を使用してカウントアップするようにしてみます。
src/frontend の App.tsx を以下のようにします。
import { useState } from "react";
import reactLogo from "./assets/react.svg";
import viteLogo from "./assets/vite.svg";
import "./App.css";
+ import { GASClient } from "gas-client";
+ const { serverFunctions } = new GASClient();

function App() {
  const [count, setCount] = useState(0);

+ const handleButton = async () => {
+   if (import.meta.env.PROD) {
+     try {
+       const response: number = await serverFunctions.sampleFunction(count);
+       setCount(response);
+     } catch (err) {
+       console.log(err);
+     }
+   } else {
+     setCount(count + 1);
+   }
+ };

  return (
    <>
      <div>
        <a href="https://vitejs.dev" target="_blank">
          <img src={viteLogo} className="logo" alt="Vite logo" />
        </a>
        <a href="https://react.dev" target="_blank">
          <img src={reactLogo} className="logo react" alt="React logo" />
        </a>
      </div>
      <h1>Vite + React</h1>
      <div className="card">
-       <button onClick={() => setCount((count) => count + 1)}>
-         count is {count}
-       </button>
+       <button onClick={handleButton}>count is {count}</button>
        <p>
          Edit <code>src/App.tsx</code> and save to test HMR
        </p>
      </div>
      <p className="read-the-docs">
        Click on the Vite and React logos to learn more
      </p>
    </>
  );
}

export default App;
import.meta.env.PROD によって、バックエンドの関数を使用するか否かの判定を行っています。
この値は yarn build した場合 true、yarn dev の場合は false を取ります。
ローカルデバッグ時は GoogleAppsScript のクラスは使用できないため、このように環境に応じて動作を分けておく必要が出てきます。
6. ビルドの設定
アプリとしての構成は出来たので、ビルドの設定を行っていきます。
最終的にフロントエンドは単一の html ファイル、バックエンドは単一の js ファイルとなるようにします。
それぞれ個別にビルドする必要があるため、vite.config.ts ファイルをコピーし、
vite.config.frontend.ts と vite.config.backend.ts を作成します。
import { defineConfig } from "vite";
import react from "@vitejs/plugin-react-swc";
import { viteSingleFile } from "vite-plugin-singlefile";

export default defineConfig({
  plugins: [react(), viteSingleFile()],
  build: {
    outDir: "gas/dist",
    emptyOutDir: false,
  },
});
フロントエンドは vite-plugin-singlefile を使用して単一ファイルを生成します。
import { defineConfig } from "vite";
import rollupPluginGas from "rollup-plugin-google-apps-script";

export default defineConfig({
  plugins: [rollupPluginGas()],
  build: {
    rollupOptions: {
      input: "src/backend/main.ts",
      output: {
        dir: "gas/dist",
        entryFileNames: "main.js",
      },
    },
    emptyOutDir: false,
    minify: false,
  },
});
バックエンドは rollup-plugin-google-apps-script を使用して単一ファイルを生成します。
どちらも emptyOutDir: false として、フォルダの初期化はスクリプト側で行います。
package.json の "scripts" を定義します。
  "scripts": {
    "dev": "vite",
-   "build": "tsc -b && vite build",
+   "clean": "rimraf gas/dist",
+   "build:frontend": "vite build --config vite.config.frontend.ts",
+   "build:backend": "vite build --config vite.config.backend.ts",
+   "build": "yarn clean && yarn build:frontend && yarn build:backend",
    "lint": "eslint . --ext ts,tsx --report-unused-disable-directives --max-warnings 0",
    "preview": "vite preview"
  }
yarn build を実行すると gas/dist フォルダ内にファイルが生成されます。
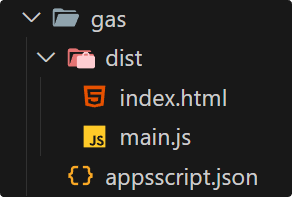
ここで作成される gas/dist は .gitignore に追加して除外しておくのが良いです。
+ # clasp
+ gas/dist
7. デプロイする
まず clasp にログインします。 以下のコマンドにより開くブラウザ上で認証を行います。
$ clasp login次にデプロイ先のプロジェクトファイルを作成します。 この方法で作成したプロジェクトファイルは Google Drive のルートに配置されます。
$ clasp create

? Create which script?
  standalone
  docs
  sheets
  slides
  forms
> webapp
  api
プロジェクトを作成すると appscript.json と .clasp.json がプロジェクトルートに作成されます。
このボイラープレートでは appscript.json は gas フォルダにあらかじめ配置しているため、
新たに作成されたものは削除してしまっても良いです。
.clasp.json の "rootDir" はアップロードする対象のフォルダを指すので変更しておきます。
{
  "scriptId": "xxxxxxxx",
-  "rootDir": "/workspaces/your project name"
+  "rootDir": "/workspaces/your project name/gas"
}また、.clasp.json は "scriptId" の情報を含んでいるため、こちらも .gitignore に追加しておきます。
# clasp
gas/dist
.clasp.json
最後にデプロイを行います。
$ yarn build # 何か変更があれば
$ clasp push
$ clasp deploy
以降は開発サイクルとして変更するたびに上記のコマンドを実行していく流れとなります。
テスト関連
1. Vitest を導入する
ユニットテストを整備するために Vitest を導入します。
$ yarn add -D vitestユニットテストを実行するため、package.json の "scripts" を定義します。
  "scripts": {
    "dev": "vite",
    "build": "tsc -b && vite build",
    "clean": "rimraf gas/dist",
    "build:frontend": "vite build --config vite.config.frontend.ts",
    "build:backend": "vite build --config vite.config.backend.ts",
    "build": "yarn clean && yarn build:frontend && yarn build:backend",
+   "test:unit": "vitest",
    "lint": "eslint . --ext ts,tsx --report-unused-disable-directives --max-warnings 0",
    "preview": "vite preview"
  }
サンプルとして作った関数に対して疎通確認してみます。
src/backend/serverFunctions に index.spec.ts を作成し、雑ですが内容を以下のようにします。
import { expect, test } from "vitest";
import { sampleFunction } from "./index";

test("If 1 is given, 2 is returned.", () => {
  expect(sampleFunction(1)).toBe(2);
});
vite.config.ts の内容を以下のようにします。
後ほど Playwright を導入し、そのテストコードは e2e フォルダに作成していきます。
Vitest の実行時に Playwright のテストが実行されないように exclude に e2e フォルダを指定しています。
+ /// <reference types="vitest" />
  import { defineConfig } from "vite";
  import react from "@vitejs/plugin-react-swc";

  export default defineConfig({
    plugins: [react()],
+   test: {
+     exclude: [
+       "**/node_modules/**",
+       "**/dist/**",
+       "**/cypress/**",
+       "**/.{idea,git,cache,output,temp}/**",
+       "**/{karma,rollup,webpack,vite,vitest,jest,ava,babel,nyc,cypress,tsup,build}.config.*",
+       "**/e2e/**",
      ],
    },
  });
Vitestの拡張機能を導入するため devcontainer.json を更新しておきます。
{
  "name": "container name",
  "image": "mcr.microsoft.com/devcontainers/typescript-node:1-22-bookworm",
  "customizations": {
    "vscode": {
-     "extensions": ["esbenp.prettier-vscode"]
+     "extensions": [
+       "esbenp.prettier-vscode",
+       "vitest.explorer"
+     ]
    }
  },
  "postCreateCommand": "yarn && yarn global add @google/clasp"
}
yarn test:unit を実行するとユニットテストが開始されパスしました。
 ✓ src/backend/serverFunctions/index.spec.ts (1)
   ✓ If 1 is given, 2 is returned.

 Test Files  1 passed (1)
      Tests  1 passed (1)
   Start at  13:19:49
   Duration  2.37s (transform 729ms, setup 0ms, collect 820ms, tests 1ms, environment 0ms, prepare 1.15s)
2. Playwright を導入する
E2Eテストを整備するために Playwright を導入します。
$ yarn create playwright

> Where to put your end-to-end tests? : e2e
> Add a GitHub Actions workflow? (y/N) : true
> Install Playwright browsers (can be done manually via 'yarn playwright install')? (Y/n) : true

yarn create playwright
コンテナ作成時に yarn playwright install --with-deps を実行するように devcontainer.json を更新します。
ついでに Playwright の拡張機能も導入しておきます。
{
  "name": "container name",
  "image": "mcr.microsoft.com/devcontainers/typescript-node:1-22-bookworm",
  "customizations": {
    "vscode": {
      "extensions": [
        "esbenp.prettier-vscode",
        "vitest.explorer",
+       "ms-playwright.playwright"
      ]
    }
  },
- "postCreateCommand": "yarn && yarn global add @google/clasp"
+ "postCreateCommand": "yarn && yarn global add @google/clasp && yarn playwright install --with-deps"
}E2Eテストを実行するため、package.json の "scripts" を定義します。
  "scripts": {
    "dev": "vite",
    "build": "tsc -b && vite build",
    "clean": "rimraf gas/dist",
    "build:frontend": "vite build --config vite.config.frontend.ts",
    "build:backend": "vite build --config vite.config.backend.ts",
    "build": "yarn clean && yarn build:frontend && yarn build:backend",
    "test:unit": "vitest",
+   "test:e2e": "playwright test",
    "lint": "eslint . --ext ts,tsx --report-unused-disable-directives --max-warnings 0",
    "preview": "vite preview"
  }
Github Actions から任意のタイミングで実行できるようにしておきます。
.github/workflowsの playwright.yml を編集します。
name: Playwright Tests
on:
- push:
-   branches: [ main, master ]
- pull_request:
-   branches: [ main, master ]
+ workflow_dispatch:
+   inputs:
+     baseURL:
+       description: 'Base URL for the tests'
+       required: true
jobs:
  test:
    timeout-minutes: 60
    runs-on: ubuntu-latest
    steps:
      - uses: actions/checkout@v4
      - uses: actions/setup-node@v4
        with:
          node-version: lts/*
      - name: Install dependencies
        run: npm install -g yarn && yarn
      - name: Install Playwright Browsers
        run: yarn playwright install --with-deps
      - name: Run Playwright tests
        run: yarn playwright test
+       env:
+         PLAYWRIGHT_BASE_URL: ${{ github.event.inputs.baseURL }}
      - uses: actions/upload-artifact@v4
        if: always()
        with:
          name: playwright-report
          path: playwright-report/
          retention-days: 30
playwright.config.ts の baseURL を調整します。
Github Actions から実行する際は PLAYWRIGHT_BASE_URL を外から指定する形にします。
use: {
  baseURL: process.env.PLAYWRIGHT_BASE_URL || 'your apps url',
}
適当なテストを作成して疎通確認してみます。
e2e 直下の example.spec.ts の内容を以下のようにします。
Vite のスタートページにあるカウントアップボタンをクリックすると結果が1になる、というテストです。
import { test, expect, Locator, FrameLocator } from "@playwright/test";

test("Clicking on it makes the count go to 1.", async ({ page }) => {
  await page.goto("");

  const appFrame: FrameLocator = page
    .frameLocator("#sandboxFrame")
    .frameLocator("#userHtmlFrame");

  if (!appFrame) {
    throw new Error("appFrame is not found");
  }

  const countUpButton: Locator = appFrame!.getByRole("button");
  await countUpButton.click();

  await expect(countUpButton).toContainText("1");
});
Google Apps Script にデプロイされたアプリは iframe の中に描画されます。
そのため、まずは FrameLocator を取得し、その中の要素に対して操作を行う必要があります。
デプロイしたアプリの公開範囲を全体に設定し、baseURL を公開URLに変更した状態で、
yarn test:e2e を実行するとE2Eテストが開始されパスしました。
Running 3 tests using 3 workers
  3 passed (10.9s)

To open last HTML report run:

  yarn playwright show-report

Done in 18.62s.
まとめ
このように、Google Apps Script で Webアプリの構築を行い、意外と色々できそうな気配はありました。
ただ、環境構築という点では難なく動いていますが、特殊な環境であるため作り込んでいくと壁にぶつかる瞬間がやってくる気もします。
ここまで書いておいてなんですが、結果としては、Google Apps Script でこういうことはやるべきではない、やる意味がない、という感想でした。
リンク
こちらの記事はQiitaにも掲載しています。
